Thursday, December 30, 2010

Kids in the Kitchen


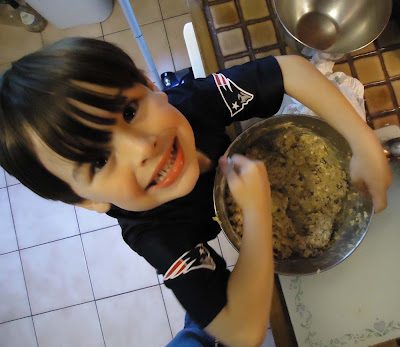
With few exceptions, children love to cook. I don't mean giving your 4 year old a frying pan and bacon and saying "go to it!" But handing them a pan to grease or a bowl to mix or a butter knife with some peanut butter and some bread and they're ready to jump in. In the process of learning how to cook they sniff, taste, and handle all sorts of varieties of foods which also has the added benefit of increasing the types of food they are willing to eat. Guaranteed that a child who cut the veggies, sprinkled the cheese, and flipped the omelette proudly onto a plate will be much more likely to eat said omelette.

Also it's fun. They are generally supervised and it keeps them from making messes in other parts of your house while you cook.

My oldest child is 5 1/2. And now he's at the point where he could make an edible simple sandwich if asked. If I am in vision range, he can make toast. He (most of the time) even remembers to put the butter away and get napkins out for each kid.

If you've never thought to give your two year old a mixing bowl and spoon, try it! What's the worst that could happen? A bit of flour (or a bowl) on your floor? Small price for an experience that you just might find the both of you grow to love.

Tuesday, December 28, 2010

Night Muffins: Chocolate Cranberry

The kids need breakfast. Correction: The kids need breakfast they can help themselves to if I'm a bit groggy and lazy and don't want to march back and forth to the kitchen twelve times at 6AM.

Chocolate Cranberry Muffins (makes 24 mini plus two regular sized)

1 cup flour
1 tsp baking powder
1/4 tsp salt
2 TBS good baking cocoa
1 egg
3 TBS melted butter
1/2 cup almond milk (just because I wanted something different, you can use regular milk)
1/2 tsp vanilla bean paste or 1 tsp vanilla extract
1/4 cup sugar
1/4 cup dried cranberries

Bake at 350 degrees. Start checking after 12 minutes.

My Dad's Spaghetti Soup (hopefully)


I haven't had my dad's spaghetti soup in years and over Christmas we were discussing it when he mentioned what he planned on making once he had his kitchen back (it's being remodeled). He instructed me on how to make it verbally and I figured I could probably work it out so that it was hopefully at least 75% as good as how my father makes it.
His instructions (as best as I remembered them, I'm sure they're not exact):
Cook onions and a little olive oil in a large pot as if you were going to start a spaghetti sauce (I also added a clove of garlic minced). Add ground beef and brown. I seasoned the beef with pepper, salt, oregano, basil, and one bay leaf. I'm not sure of when he said to add the sauce spices but this worked for me. Add two cans of Pastene Kitchen Ready (these are the only canned tomatoes I use. The flavor is out of this world and it's not concentrated. I also read that they don't line their cans with the plastic bpa coating which is an added bonus for me.) Add four cans of water and cook for a while. Adjust seasoning to taste. You can tell when it gets that "sauce" flavor and the kind of tart flavor smoothes out. Add 1/2 box thin spaghetti (he said thin spaghetti or angel hair but I prefer thin spaghetti) breaking it up into lengths of about 2-3 inches. Simmer until spaghetti is cooked through. I turned the heat off and let it sit for about 15 minutes before having a bowl. The spaghetti was just perfect at that point. Top with shredded parmesan (or whatever you have).


Tuesday, December 14, 2010

Dye Free Sugar


Making non-artificially dyed sprinkle sugar is really easy. The range of colors you can get with natural dyes is a tiny bit smaller and admittedly not quite as glowing as with artificial dyes but you can get a nice range. If your children are a bit sensitive to certain chemical dyes (my kids have been known to enter "wild-demon-child" phases a few hours after consuming some of them) then you can appreciate having options when your kids beg for sprinkles.

Vegetable based food dyes are nice and are fairly bright but they are also hugely expensive. A three pack at Whole Foods runs at about 18-20 dollars. The last set I had was about ten dollars from the Vitamin Shoppe with a free shipping deal when I purchased Fenugreek but I haven't seen anything like that in a long time.

Dying sugar brings me back to my days as a summer camp counselor when we would use things like coffee, spinach, and beets to do natural cloth tye dyes. This batch was done with beet juice quickly so I did not boil and concentrate which is why it's more of a light magenta color than the burgundy red I would have gotten otherwise.

To make a batch like this stir in about 1/2 to 1 tsp of the juice (beet juice, cherry juice, blueberry juice, spinach juice...etc) in a half cup of sugar. Mix it well and let it sit out for about four hours stirring about once every half hour. If the sugar isn't completely dry and crumbly then you'll need to have it sit out longer. Once it's fully dry and no longer "sticks" when you mix it you can store it in a glass or plastic container.

You will get darker colors if you boil off some of the water in the juice first. At camp we would boil down beet juice on low heat until it was practically black. It would give the cloth (sugar) a deep burgundy color.

This is a really fun project to experiment with!

Monday, December 13, 2010

Toffee Chocolate Pretzels


Why yes, that is a whole stick of butter. Got a problem with that? :)

I'd been planning for a while to see how rusty my toffee recipe was and had been a bit slacky on purchasing pretzel rods but as luck has it our friend Joan provided us with a bag of mini pretzel rods last night which seemed perfect for working it out.

Toffee is a bit tricky to make in a stainless pan, which is what I use for nearly everything else. I use a coated le creuset pan that's probably older than I am that is the absolute perfect color for making candies of any kind. A cherished hand-me-down from my parent's kitchen. I rarely even have to do the "hard crack" test when I use the right pan. Unless, of course, one's spouse calls at the moment between "done" and "burnt" like what happened to me today. Luckily, I caught it in time. The line comes and goes quickly.

To make the toffee I mix 3/4 cup sugar and a stick of butter (the real stuff...no skimping). Some people use brown sugar but this is one of the things I prefer taboo white sugar for. It's so much easier to judge color. I put it on medium high heat stirring constantly and the whole process probably takes 10-12 minutes. The candy is ready when it is just about to turn that deep golden caramel color. It cooks a bit more in the pan even after you turn it off. A tablespoon of water stirred in near the end of the process and cooked off deepens the color if you feel that you are just stirring buttery yellow paste for too long without results.

This is a trial and error process. I've had some not so great batches that I've just poured on pam-sprayed foil (really what's the point when you've used a stick of butter?) and cracked up for "eh, it still tastes good" toppings or candy or whatnot. Just try it a couple of times and eventually you'll get it. :)

Monday, November 8, 2010

Congo Bars


Congo Bars

2 cups flour (for this I used 1 cup unbleached white and 1 cup white whole wheat)
2 cups brown sugar
2 tsp baking powder
1/4 tsp salt
5.4 oz butter (or 2/3 cup)
3 eggs
2 cups chocolate chips
1 cup walnuts
1/2 cup unsweetened shredded coconut (if desired...I skipped it this time)
2 tsp vanilla

Soften butter. Mix all ingredients in a bowl until well blended. Spread mix in a rectangular baking pan and bake at 350 degrees for 35-40 minutes. Top will look golden and slightly cracked.

Slice while still warm but not hot. Serve cooled (but who can resist eating one while it's still gooey right?)

Tofu Corn Dogs


I'll start this by declaring that while these were loved by the children, there is definitely room for improvement. To start, the batter was too thin. I should have made the batter a little thicker. Also, I fried these and I should have either used a less shallow pan, or I should have baked them. As you can see, they tended to widen a bit when they cooked.


We used "smart dogs" veggie protein links. They do look, smell, and taste a lot like hot dogs. The texture leaves something to be desired. As the only carnivore in my spousal relationship, what I really miss is that snap of biting into a real hot dog. These are a bit..."soft". That being said, the kids ate a ton of them and my better half would have enjoyed them more if I had baked them instead.

Next time I will try making the batter thicker to hand form it around the dog and baking it to help keep it's shape.


Tuesday, October 26, 2010

I Love These


You can buy these little aluminum trays with or without covers for pennies at places like Job Lot or Dollar Tree. The smallest sizes I've seen for about 12 cents a piece and the large ones for about 25 cents a piece. Or you can reuse them from places that offer salad bars.
My favorite method for storing and heating anything edible is glass, and that's what I use most of the time. But for things I want to put in long term freezer storage, this seems to be working fairly well. So far my chest freezer has turkey pot pie, vegetarian pot pie, and quiche stored in this way. I'll be moving on to fruit pies next but I wanted a few dinner options taken care of first.
The most space efficient way to seal it is to trace the top (widest) part of the pan on a piece of paper. Fold a sheet of aluminum foil in half and hold the paper against it while cutting out the circle. Place the foil sheets on the food portion first and then the circle of paper (which you can write the contents on). Pinch the lip of the tray around it and put the whole thing in a gallon sized bag to freeze and store. The bags can be reused over and over.

Monday, October 18, 2010

Cranberry Sauce


I first made cranberry sauce last year after a frustrated attempt to find sauce in a supermarket near me that didn't contain High Fructose Corn Syrup. (I've since discovered that Ocean Spray puts out cans around Passover made with regular sugar that you can buy in the Kosher aisle, so I bought a few to have on hand)
My wand mixer is in storage at the moment while we have our house on the market so normally it comes out fully jelled and more even in consistency. This batch turned out more like a whole berry sauce. Still thick, but not quite as jelled as I usually make.
Cranberry Sauce:
1 standard sized back of cranberries washed and picked through to pull out stems
3/4 cup sugar
2 cups water
Put cranberries, 1/2 cup of the sugar, and the water into a saucepan and heat on medium heat. When berries start to "pop" and develop a ring of froth add the remaining 1/4 cup sugar. Simmer for about 10-15 minutes on low-medium heat using spoon to pop cranberries that havent split yet. When mixture is thick and sounds kind of like oatmeal cooking, remove from heat and let sit another 10 minutes. Using a wand or hand mixer, blend the mix well. Store in a glass container with lid and refrigerate.


Sunday, October 17, 2010

Vegetable Pot Pie


Wow did this come out good. Even our niece Christine said that you couldn't tell that the gravy wasn't meat gravy. A few tweaks to add more green veggies and less potatos and I think we're good. Since this meal was lacking a bit in the protein area we also served it with both vegetarian "meatballs" and regular meatballs (for those of us who are still a little bit carnivore).

The Crust (makes two medium sized pies or one pie of traditional size):
2 cups flour
1 tsp salt
1 stick plus 2 TBS butter
1/4 cup to 6 TBS cold water

Mix together flour and salt. Cut butter into small cubes and toss with the flour to coat cubes. Using a pastry blender (or two knives) cut butter into flour until bits are about the size of a pea or even a bit smaller. Sprinkle cold water 2 TBS at a time onto the mix and fluff until it is coated and when pressed will stick together. Mixture should not feel wet but it should stick together.
Refrigerate dough for at least 20 minutes.

Divide into the number of crusts you need (no more than four) and roll out each section on a well floured surface. Add crust to pan and press into bottom and sides if air pockets puff it up. Fill with vegetables and gravy(etc) and then cover with top crust. Press and roll in the sides. Remember that it doesn't have to be perfect. The best pie crusts are the ones that look kind of funky.
The gravy:
1 TBS paste style vegetable boullion
3 cups water
3 TBS clarified butter (you can use regular butter)
3-5 TBS flour

Mix boullion into 3 cups warm water until dissolved completely. Set aside. In a saucepan, make a roux by melting clarified butter on medium-low heat and whisking in the flour to make a semi wet paste. When paste forms, add broth and turn heat to medium-high. Whisk steadily until gravy thickens. If gravy does not form to your liking, you can add a pit more flour pre-mixed with water slowly to thicken it.

Pies should bake at 425. Start checking after 25 minutes. This pie took about 35 minutes but I like my crust slightly on the darker side.

If you do try this, let me know how you make out with it. Usually our vegetarian meal substitutes are tasty and passable (like shepherdless pie) but this one we all devoured and we honestly were hard pressed to tell the difference in flavor between this and a meat pot pie.


Thursday, October 14, 2010

A Picture is Worth


Favorite Oven Fries


These excellent fries have been part of a near weekly ritual since my oldest started Kindergarten. His school offers a fast food lunch twice a week and after discussing compromise options with him, he sticks with the pizza lunch on Fridays and we send our own homemade chicken tenders and fries on Wednesdays. These are usually made the night before and I pack them in his sandwich container with chicken strips I've made and frozen previously and the school heats it up for him.
Oven Fries:
8-10 small to medium round style potatoes
1/4 cup canola oil plus 2 TBS olive oil
salt and seasonings to taste
Wash and cut potatoes into thin wedged shaped pieces. Toss slices in a large bowl with oil and other seasonings. (I use a blend of rosemary, pepper, sage, thyme, sea salt, orange rind, lemon rind, garlic and onion). Arrange slices into single layer on cookie sheets and bake at 425. Start to check them in 8 minutes and then every 3 minutes after. When golden brown on one side, flip them and bake again starting to check after 5 minutes. Blot with paper towels if desired.
related links:

Monday, October 4, 2010

Pumpkin Pancakes


I'm not at my best at 6AM. There, I said it. When I start to hear the thumpity-thump stirrings of little legs that will soon be sticking cold feet into my bed with me usually my brain jumps to something like "Oh, crud. Is there something for breakfast that they can get themselves?"
Our family's smallest members eat a lot of trader joes cereal bars, mozzerella cheese sticks, yogurt, and muffins for breakfast. They are quick and easy and they can help themselves while I figure out which side of my end table I left my glasses on.
Pancakes are a great make ahead food. They are inexpensive and easy to make and they can be eaten cold straight out of the fridge. Or if the kids aren't impatient, it takes me 10 seconds to heat them in the microwave (not something my oldest is ready to be using yet).
I have been using a Betty Crocker recipe for pancakes for years. I stick with them because they are super fluffy and taste like the bisquick ones. I was concerned that the addition of pumpkin would make them flat but they turned out nearly as fluffy as the original. I think we'll be making this one regularly.
Pumpkin Pancakes:
1 cup flour (I use 1/2 white and 1/2 whole wheat)
1 TBS sugar
1 TBS baking powder
1/4 tsp salt
1 egg
1/2 cup milk
3/4 cup pureed pumpkin
2 TBS oil or melted butter (I use oil)
2 tsp cinnamon
2 tsp nutmeg
1/2 tsp vanilla (optional)
Mix all ingredients in a bowl until desired consistency. I like a fluffy, thicker pancake so I make my batter as shown. If using whole wheat flour in part, like I do, the mixture will thicken a little as it sits. I like to let my batter rest about 10 minutes before I begin using it.


Lemon Squares


For the past nearly four years my outside-the-home job has been that of a part-time (3/4 time) supermarket banker. Because our branch has later hours, I generally have a flexible schedule that allows me to balance between home and earning a bit of an income. I like my job most of the time. I get to take care of my customers start to finish. A customer might make a deposit with me, then apply for a loan with me, then meet with me two weeks later where I'll perform the loan closing with them. I have my moments, as in all jobs, when I think "What on earth am I doing here?" but the things that keep me grounded during that time are some great people I work with and some of my really friendly long-term customers.

I wear a name tag that has a spot on it where each colleague is asked to write something personal about themselves as a "conversation starter." Mine reads: "I like to bake."

Usually a handful of times I'll be asked about it during a regular day. Customers will share the things they like to make and we'll talk about it while I help them with their business. Not long ago, I received this recipe for lemon bars from Mrs. L. So thanks Mrs. L. for the great recipe!

Mrs. L's Lemon Squares:

2 1/4 cups flour
1/2 cup confectioners sugar (I used regular sugar because I was out and they came out just fine)
1 cup butter (two sticks) melted
4 eggs
2 cups sugar
1/2 cup lemon juice
1/2 teaspoon baking powder

Mix together 2 cups flour, melted butter, and 1/2 cup confectioners sugar. Mix well and spread into the bottom of a 9 x 13" pan. Bake at 350 for 25 minutes.

Mix together eggs, 2 cups sugar, lemon juice, baking powder, and remaining flour (1/4 cup) and blend together very well. Pour onto the baked shell and bake at 350 for another 25 minutes or until set.

Dust with confectioners sugar when cool, if desired.

Cut into bars.

These pictures didn't come out so hot but trust me, they are tasty.

Yummy!